Bleach Tie-Dye T-Shirts: Unique Summer 2025 Look DIY

Anúncios
Achieve a distinct 2025 summer aesthetic by mastering how to bleach tie-dye T-shirts, a creative and simple DIY technique that transforms ordinary garments into personalized, eye-catching fashion statements with stunning, unpredictable patterns.
The summer of 2025 beckons with a call for individuality and sustainable style. If you are looking to infuse your wardrobe with a truly unique flair, understanding how to bleach tie-dye T-shirts for a unique 2025 summer look stands out as a compelling, creative endeavor. This technique offers a fantastic opportunity to transform ordinary garments into personalized masterpieces, perfectly suited for the season’s vibrancy.
Understanding the Bleach Tie-Dye Technique
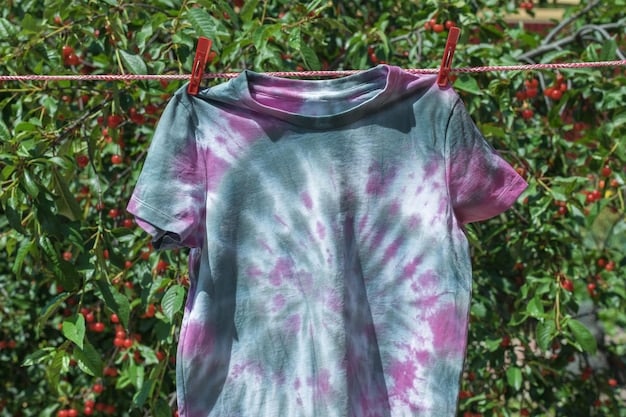
Bleach tie-dye, often referred to as reverse tie-dye, offers a fascinating twist on the traditional colorful tie-dye methods. Instead of adding vibrant dyes to fabric, this technique involves strategically removing color using a bleach solution. This process creates striking, often unpredictable patterns that can range from subtle fades to dramatic contrasts, depending on the fabric and application method. The beauty of bleach tie-dye lies in its inherent unpredictability; each shirt emerges with its own distinct character, ensuring no two pieces are ever exactly alike.
The chemical reaction between bleach and fabric dyes is what makes this process so unique. Bleach, a powerful oxidizing agent, breaks down the color molecules in the fabric, resulting in lighter, often yellowish or orange tones where applied. The type of fabric plays a crucial role in the final outcome. Natural fibers like cotton tend to react most effectively with bleach, yielding clearer and more defined patterns than synthetic blends.
Selecting Your Materials: Beyond the Basics
Before diving into the creative process, gathering the right materials is paramount. While the core ingredients are simple, attention to detail in selection can significantly impact your results. Opt for T-shirts made of 100% cotton, as they offer the best response to bleach. Darker colors such as black, navy, or dark gray provide the most dramatic contrast for your designs. Lighter colors like red or blue can also work, but their bleached areas might appear less stark.
- Fabric Choices: Prioritize 100% cotton T-shirts. Old, well-loved shirts can be great candidates.
- Bleach Type: Regular household chlorine bleach is suitable. Avoid “no-splash” or “color-safe” bleaches as they may not be effective.
- Protective Gear: Rubber gloves are essential to protect your hands. Safety goggles are also recommended to shield your eyes from splashes.
Beyond the T-shirt and bleach, you’ll need a bucket or basin for the bleach solution, rubber bands or string for tying patterns, a stirring stick, and access to a well-ventilated area. A drop cloth or old towels are also useful to protect your work surface from spills. Gathering all your materials beforehand ensures a smooth and safe creative experience, allowing you to focus on the artistry of the process. Understanding the basics of material selection and their impact on the final design can transform a simple craft into a truly custom fashion statement.
Essential Safety Precautions and Workspace Setup
Working with bleach requires careful consideration of safety to protect yourself and your surroundings. Bleach is a corrosive chemical that can cause skin irritation, eye damage, and respiratory issues if not handled properly. Therefore, setting up a safe and well-prepared workspace is not just a recommendation but a necessity for anyone looking to engage in bleach tie-dyeing. Ignoring these precautions can lead to unpleasant and potentially harmful outcomes.
Protecting Yourself and Your Space
The first line of defense is personal protective equipment. Rubber gloves are indispensable for keeping bleach off your skin, preventing chemical burns and irritation. Even a small splash can cause discomfort, so ensure your gloves are sturdy and free of holes. Similarly, safety goggles are crucial for protecting your eyes from accidental splatters. Bleach can cause severe eye damage upon contact. These inexpensive items are non-negotiable for a safe process.
- Ventilation: Always work in a well-ventilated area. Outdoors is ideal. If working indoors, ensure windows are open and a fan is running.
- Surface Protection: Cover your work surface with a tarp, old newspapers, or heavy-duty plastic sheeting. Bleach will permanently discolor or damage most surfaces it comes into contact with.
- Old Clothing: Wear old clothes that you don’t mind getting stained, as bleach can easily splash and create permanent marks.
A designated workspace, away from pets and young children, is also vital. This minimizes the risk of accidental exposure and ensures a focused environment for your project. Having a water source nearby, such as a garden hose or a sink, is beneficial for immediate rinsing in case of spills or splashes on skin.
Before you even open the bleach bottle, make a plan for disposal. Never pour bleach directly into a drain without diluting it significantly. The safest approach is to dilute it with plenty of water after use or properly dispose of it according to local hazardous waste guidelines. Taking these safety steps seriously ensures that your creative endeavor remains enjoyable and safe from start to finish.
Creating Classic Tie-Dye Patterns with Bleach
The magic of bleach tie-dye lies in reinterpreting classic tie-dye patterns through a chemical lens. While the process of tying is similar, the result—color removal rather than addition—yields strikingly different visual effects. Exploring various folding and tying techniques allows for a wide range of designs, from bold geometric shapes to fluid, organic swirls. Each method offers a unique canvas for the bleach to work its magic.
The Swirl: A Timeless Favorite
The swirl pattern is arguably the most iconic tie-dye design, and it translates beautifully to bleach tie-dye. To create a swirl, lay your damp T-shirt flat. Pinch a section of the fabric in the center and begin twisting it clockwise or counter-clockwise, allowing the fabric to gather around the central point. Continue twisting until the entire shirt forms a flat, circular disc. Secure the disc tightly with several rubber bands, crossing them over the center to create at least four or six sections, like slices of a pie. The tighter the bands, the more defined your lines will be.
Another popular technique is the crumple or scrunch pattern, which yields a more organic, free-form design. For this, simply scrunch the damp T-shirt into a loose ball, then secure it randomly with two or three rubber bands. This technique allows for a more unpredictable and natural bleached effect, with soft, flowing lines and splotches that mimic abstract art. It’s an excellent choice for beginners due to its forgiving nature.
- Bullseye: Pinch the shirt in the desired center of the bullseye. Pull up and secure with rubber bands moving down the fabric, creating concentric circles.
- Accordion Fold: Fold the shirt back and forth like an accordion, then secure it at intervals with rubber bands for stripes.
- Spiral Variation: Instead of pinching the center, pinch a point slightly off-center for a spiral that flows diagonally across the shirt.
Remember, the pressure of the rubber bands is key. Tighter bands will create more defined unbleached areas, leaving crisp lines and sharper distinctions between light and dark. Looser bands, conversely, will allow more bleach to seep into the tied sections, resulting in softer, more diffused patterns. Experiment with these different methods to discover what works best for your desired aesthetic and to truly make your bleach tie-dye T-shirts for a unique 2025 summer look stand out.

Applying and Processing the Bleach Solution
The application of bleach is where the true transformation begins, and it requires precision and patience. The right concentration, application method, and processing time are all critical factors that contribute to the final appearance of your bleached tie-dye design. Rushing this stage can lead to undesired results, such as over-bleaching or uneven patterns.
Diluting and Applying Bleach
First, prepare your bleach solution. A common recommendation is to dilute household bleach with an equal part of water (1:1 ratio). This dilution helps to control the bleaching process, making it less aggressive and giving you more control over the intensity of the color removal. For a stronger effect, you might use a 2:1 bleach to water ratio, but always start with a weaker solution if unsure. Pour the mixture into a plastic spray bottle for targeted application or a bucket for dipping.
If using a spray bottle, lay your tied T-shirt on your protected surface and begin spraying the solution onto the exposed areas. You’ll notice the fabric gradually losing its color. For dipping, submerge portions of your tied shirt into the bucket, allowing the bleach to soak into specific sections. For both methods, flip the shirt to ensure even exposure on both sides, or to create a mirrored design. Work methodically to avoid accidentally bleaching areas you wish to remain dark.
Processing time is perhaps the most critical aspect of bleach tie-dyeing. The time it takes for the bleach to react effectively depends on several variables: the strength of your bleach solution, the type of fabric, and the original color of the T-shirt. Light-colored cottons may react quickly, sometimes within 5-10 minutes, while darker, thicker fabrics might require 20-30 minutes, or even longer. It’s essential to monitor the shirt closely during this phase.
- Observe Color Change: Do not rely solely on a timer. Watch the fabric’s color change in real-time.
- Rinsing: Once the desired level of bleaching is achieved, immediately rinse the shirt thoroughly under cold running water. This stops the bleaching process.
- Neutralization (Optional but Recommended): Some recommend soaking the shirt in a mixture of water and hydrogen peroxide (about 1 part hydrogen peroxide to 10 parts water) for 10-15 minutes immediately after rinsing. This helps neutralize any remaining bleach and protects the fabric from degradation over time.
After rinsing and neutralizing, carefully remove the rubber bands. You will see your design emerge. It’s normal for the wet fabric to appear slightly darker than it will when fully dry. The exciting reveal of your unique design is a testament to the careful application and processing you’ve undertaken.
Washing, Drying, and Maintaining Your Bleach Tie-Dye Creations
Once your bleach tie-dye T-shirt has been processed and rinsed, the final critical steps involve washing, drying, and proper maintenance. These stages are vital not only to set the design and remove any residual bleach but also to ensure the longevity and vibrancy of your unique creation. Skipping or rushing these steps can lead to further color degradation or damage to the fabric, ultimately compromising your artistic efforts.
The Initial Wash: Sealing the Deal
After the initial rinse and optionally, the hydrogen peroxide neutralization, it’s time for a proper wash. This first wash is paramount for completely removing all traces of bleach, which would otherwise continue to weaken the fabric fibers over time. Wash your newly bleached T-shirt separately from other garments, especially during its first few washes. Residual bleach can transfer and inadvertently stain other clothes.
Use a mild detergent and wash on a cold cycle. Hot water can sometimes reactivate remaining bleach or cause further color stripping. A gentle cycle is recommended to protect the integrity of the fabric. Avoid using fabric softener in this initial wash, as it can sometimes leave a residue that interferes with the fabric’s natural feel later on. After the cycle is complete, inspect the water in the washing machine; if it has a strong bleach odor, consider running another rinse cycle.
- Separate Washes: Always wash bleach tie-dye items separately at first.
- Cold Water: Prevents further bleaching and protects fabric.
- Mild Detergent: Gentle on both the fabric and the environment.
Once washed, your T-shirt is ready for drying. Tumble drying on a low heat setting or air drying are both suitable methods. Air drying, however, is often preferred as it is gentler on the fabric and helps preserve the colors. Hang the shirt on a line or lay it flat to dry naturally, avoiding direct strong sunlight for extended periods as this can fade colors over time, although in this case, it applies more to the remaining original dark color rather than the bleached areas.
Long-Term Care for Permanent Style
For ongoing maintenance, continue to wash your bleach tie-dye T-shirts with care. Washing on a cold, gentle cycle with similar colors is always advisable. Although the initial separate washes are the most crucial, it’s a good practice to avoid washing them with delicate items that could be damaged by any lingering chemical residues, however minimal. Turning the T-shirt inside out before washing can also help protect the design.

Over time, the bleached areas of your T-shirt may naturally soften in tone, and the unbleached areas might fade slightly. This is part of the natural aging process of fabric and contributes to the garment’s unique character. By following these washing and drying guidelines, you can ensure that your bleach tie-dye creations remain a stylish and comfortable part of your 2025 summer wardrobe for seasons to come. Proper care reflects not just garment maintenance, but also an appreciation for the creative process involved.
Creative Variations and Advanced Bleach Tie-Dye Techniques
While mastering the classic bleach tie-dye patterns is a great starting point, the true artistry of this technique lies in exploring advanced variations and incorporating other creative elements. Moving beyond simple swirls and crumples can unlock a vast array of unique designs, allowing for greater artistic expression and truly personalized apparel that stands out. The beauty of bleach tie-dye is its adaptability to various artistic impulses.
Combining Bleach with Traditional Dyeing
One of the most exciting advanced techniques is the combination of bleach tie-dye with traditional fabric dyeing. This two-step process allows for incredible depth and complexity in your designs. First, you perform the bleach tie-dye process on a dark-colored shirt as usual, creating the initial pattern. After thoroughly washing and drying the bleached shirt, you then apply traditional fabric dyes to the now lighter areas, or even the entire shirt, to reintroduce color.
For example, you could bleach a black shirt to create intricate white or orange patterns, and then over-dye the entire shirt with a vibrant blue or green. The original dark areas will take on a new hue, while the bleached sections will absorb the new dye intensely, creating a fascinating multi-tonal effect. This multi-layered approach gives you precise control over both the pattern and the color palette, moving beyond the monochromatic limitations of bleach-only designs.
- Layered Effects: Add dye to bleached sections for a new color dimension.
- Resist Techniques: Use wax or stencils to block bleach or dye for crisp, defined lines.
- Discharge Paste: For more controlled bleaching, try discharge paste that removes color with more predictability.
Strategic Bleaching and Stenciling
Beyond traditional tying, consider employing strategic bleaching or stenciling for more precise designs. Instead of fully submerging or tying the shirt, you can use brushes, sponges, or even squeeze bottles to apply bleach directly to create freehand designs, splatter effects, or gradients. This method requires a steady hand and a clear vision of your desired outcome.
For sharp, repeatable designs, stenciling with bleach is an excellent option. Place a plastic or sturdy cardboard stencil on your T-shirt, then lightly dab or spray a diluted bleach solution over the stencil. The areas under the stencil will remain dark, while the exposed areas will lighten, forming your design. Remember to remove the stencil promptly once the desired lightening is achieved to avoid bleeding under the edges.
These advanced techniques transform bleach tie-dye from a simple crafting activity into a sophisticated art form. By experimenting with methods like combining bleach with traditional dyes, utilizing discharge pastes, or incorporating stenciling, you can push the boundaries of what’s possible and develop truly unique apparel. The summer of 2025 is the perfect time to showcase these personalized, artistically rich garments, proving that DIY fashion can be both innovative and stylish.
Styling Your Bleach Tie-Dye T-Shirt for Summer 2025
Now that you’ve mastered the art of creating your unique bleach tie-dye T-shirts, the next step is integrating them seamlessly into your 2025 summer wardrobe. These distinctive pieces are more than just casual wear; they are statement garments that can be dressed up or down, offering versatility and a clear reflection of your personal style. Embracing them means infusing a fresh, contemporary vibe into classic summer looks.
Casual Chic: Effortless Summer Vibes
For a quintessential summer look, pair your bleach tie-dye T-shirt with high-waisted denim shorts or distressed jeans. This combination exudes a relaxed, yet stylish, aesthetic perfect for beach days, casual outings, or festivals. Complement the outfit with comfortable espadrille sandals or classic white sneakers. Add a straw hat and oversized sunglasses for a touch of glamorous ease. The T-shirt, being the focal point, allows other elements of your outfit to remain simple and functional, creating balance.
For a slightly elevated casual look, consider layering. A lightweight, unbuttoned linen shirt or an oversized denim jacket thrown over your bleach tie-dye tee can add depth and texture. This works especially well for cooler evenings as the summer days transition. The key is to let the unique pattern of your T-shirt shine, using other pieces to enhance rather than detract from its individuality. Accessorize minimally with a simple pendant necklace or small hoop earrings to keep the focus on the shirt.
- Denim Duo: Best paired with light-wash or distressed jeans and shorts.
- Layering: Use open button-downs or light jackets for added style.
- Footwear: Sandals, sneakers, or espadrilles complete the relaxed look.
Elevating Your OOTD: Dress It Up
Bleach tie-dye T-shirts can surprisingly transition from day to night or super casual to effortlessly chic. Tuck your shirt into a sleek midi skirt, perhaps in a solid contrasting color or a neutral tone like black or olive. This pairing offers an unexpected blend of streetwear edge with feminine sophistication. Finish the look with block-heeled sandals or ankle boots for an edgy, yet refined, ensemble. A structured crossbody bag can add polish.
Another option for dressing up your bleach tie-dye is to pair it with tailored trousers or flowy wide-leg pants. Opt for trousers in a solid color that picks up one of the subtle tones in your bleached design. This creates a cohesive and intentional outfit, proving that a tie-dye T-shirt can be just as versatile as any other staple. Don’t shy away from adding bold accessories like a statement belt or layered necklaces to fully express your unique take on 2025 summer fashion. The inherent handcrafted nature of a bleach tie-dye T-shirt for a unique 2025 summer look means it already brings a story to your outfit, making it a powerful foundation for personal expression.
| Key Point | Brief Description |
|---|---|
| 🎨 Unique Designs | Bleach tie-dye offers one-of-a-kind patterns by removing color, ensuring unique results every time. |
| 🛡️ Safety First | Essential to use gloves, goggles, and work in well-ventilated areas to prevent chemical exposure. |
| 🌀 Pattern Variety | From spirals to crumples, various tying techniques create diverse and striking bleached effects. |
| 🧼 Proper Care | Wash separately with cold water and mild detergent for longevity and color integrity. |
Frequently Asked Questions About Bleach Tie-Dye
100% cotton T-shirts yield the best results for bleach tie-dyeing because natural fibers react strongly and predictably with bleach. While some synthetic blends might show minimal effects, pure cotton provides the most vivid and lasting bleached patterns. Darker colored shirts, like black or navy, offer the most dramatic contrast for your designs.
Bleach tie-dye can be safe if proper precautions are followed. Always work in a well-ventilated area, preferably outdoors. Wear rubber gloves to protect your hands and safety goggles to shield your eyes from splashes. Cover your work surface with a protective sheet, and wear old clothes that you don’t mind staining. Keep bleach away from children and pets.
The processing time for bleach tie-dye varies depending on the fabric type, its original color, and the bleach solution’s strength. It can range from 10 to 30 minutes. The key is to monitor the color change closely. As soon as you achieve your desired lightness, immediately rinse the shirt thoroughly under cold water to stop the bleaching process and prevent fabric damage.
To ensure your bleach tie-dye design lasts, proper rinsing and washing are crucial. After bleaching, rinse thoroughly, then wash the shirt separately in cold water with a mild detergent. Some recommend soaking it in a hydrogen peroxide solution after rinsing to neutralize remaining bleach. Always air dry or tumble dry on a low setting, and avoid high heat or harsh detergents in subsequent washes.
Yes, combining bleach tie-dye with traditional fabric dyes is an advanced technique that yields stunning, multi-dimensional results. First, complete the bleach tie-dye process on a dark shirt, wash, and dry it completely. Then, apply traditional fabric dyes to the entire shirt or specifically to the now-lightened areas. This allows you to reintroduce vibrant colors, creating unique layered effects.
Conclusion
Embracing the trend of how to bleach tie-dye T-shirts for a unique 2025 summer look offers an exciting and sustainable way to refresh your wardrobe. This creative endeavor not only provides a fun DIY project but also results in truly individualized garments that effortlessly stand out. From understanding the basics of fabric and bleach reaction to mastering various tying techniques and crucial safety measures, each step contributes to a successful and rewarding outcome. As you sport your custom-made pieces, remember the hands-on journey that transformed a simple T-shirt into a unique expression of your personal style, perfectly aligned with the laid-back yet distinct aesthetic of summer 2025.


