Master Contouring & Highlighting: The Ultimate Step-by-Step Guide
Anúncios
Achieving a flawlessly sculpted look is made accessible through this definitive guide, providing a comprehensive, step-by-step tutorial on contouring and highlighting techniques, essential product selection, and application methods for every face shape.
Unlock the secrets to a sculpted and luminous complexion with The Ultimate Guide to Contouring and Highlighting: A Step-by-Step Tutorial. This comprehensive resource delves into the art of defining your features and adding a radiant glow, transforming your daily makeup routine. Whether you’re a beginner or seeking to refine your skills, understanding these techniques can dramatically enhance your natural beauty. Join us as we explore the essential tools, products, and methods to master this transformative makeup artistry.
Understanding the basics: what are contouring and highlighting?
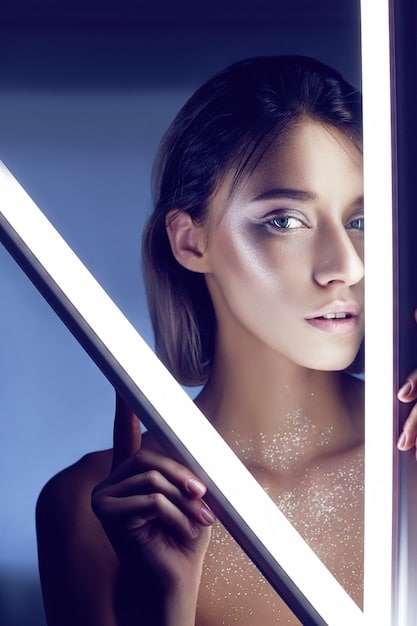
Contouring and highlighting are fundamental makeup techniques designed to enhance facial features by creating dimension and definition. These methods work by strategically applying darker and lighter shades of makeup to specific areas of the face, leveraging the play of light and shadow.
Contouring involves using a matte, cooler-toned shade that is typically two to three shades darker than your natural skin tone. The goal is to create shadows, receding areas, and define bone structure, such as cheekbones, jawline, and the sides of the nose. This technique provides the illusion of depth, making certain features appear more prominent or refined.
The science behind the magic
At its core, contouring and highlighting manipulate how light interacts with your face. Dark shades absorb light, making areas appear to recede, while lighter, shimmering shades reflect light, bringing areas forward. This optical illusion creates a sculpted effect that can enhance or diminish features as desired.
- Contouring: Creates shadows to define and slim features.
- Highlighting: Adds light to bring features forward and create a radiant glow.
- Strategic placement: Key to achieving a natural and balanced look.
Highlighting, conversely, uses a lighter, often shimmering, product to draw attention to the high points of the face where light naturally hits. These areas typically include the tops of the cheekbones, the brow bone, the bridge of the nose, and the Cupid’s bow. Highlighting creates a luminous, radiant effect, making the skin appear healthier and more vibrant.
Together, these techniques are not about changing the shape of your face, but rather about enhancing its natural structure. When done correctly, contouring and highlighting can create a more symmetrical and sculpted appearance, making your features pop without looking overly done. It’s a subtle art that can elevate any makeup look from simple to sophisticated, providing a polished finish that complements your natural beauty.
Choosing the right products: creams, powders, and liquids
Selecting the appropriate products is a critical first step in mastering contouring and highlighting. The vast array of options can be overwhelming, but understanding the differences between creams, powders, and liquids can help you make informed choices based on your skin type, desired finish, and application preference.
Cream products, often found in stick, pot, or pan form, are favored for their blendability and natural finish. They are particularly suitable for dry or mature skin types, as they tend to be less drying and can create a more dewy, skin-like appearance. Cream contours and highlights are excellent for achieving a soft, subtle definition, offering a seamless integration with your foundation. They provide good control during application and are forgiving for beginners, allowing for easy blending before setting.
Navigating product types and their ideal uses
Each product type offers unique benefits that cater to different preferences and skin needs. Experimenting with various formulas can help you discover what works best for your individual routine.
- Creams: Ideal for dry skin, dewy finish, and everyday wear.
- Powders: Best for oily skin, matte finish, and setting cream products.
- Liquids: Versatile, buildable, and provide a radiant, natural look.
Powder products, available in pressed or loose forms, are generally preferred by those with oily or combination skin, or for achieving a more matte and long-lasting finish. They are applied over foundation and can be used to set cream products, providing an extra layer of definition and durability. Powder contours offer a sharper, more defined look, while powder highlights deliver a noticeable shimmer. They require a lighter hand and precise application to avoid a patchy or unnatural appearance.
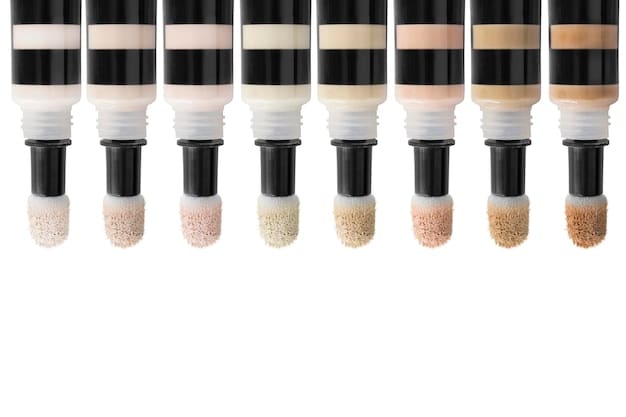
Liquid highlighters, often dispensed with a dropper, are highly versatile. They can be mixed with foundation for an all-over glow, applied directly to high points for intense radiance, or used as a subtle luminosity boost. Liquid products are known for their strong pigment and ability to create a very natural, “lit-from-within” glow, but they do require quick blending due to their fast-drying nature. Understanding these distinctions will enable you to curate a collection that perfectly suits your beauty goals, laying a strong foundation for mastering contouring and highlighting.
Essential tools for seamless application
Even with the best products, achieving a professional-looking contour and highlight depends heavily on the right tools. Brushes, sponges, and even your fingertips play crucial roles in how seamlessly products blend into your skin, influencing the final finish and overall effect.
For contouring, the type of brush matters significantly. Angled contour brushes are designed to fit the hollows of your cheeks and jawline, allowing for precise application of powdered products. Denser, flat-top brushes are excellent for cream contours, providing the necessary pressure to blend without streaks. The key is to choose brushes that allow for controlled placement and effortless diffusion, preventing harsh lines and ensuring a natural shadow.
Brushes, sponges, and fingers: mastering the blend
Each tool offers a unique advantage for blending. Knowing when to use which can elevate your application technique and result in a more polished look.
- Angled brushes: Precision for contouring powder.
- Denser brushes: Seamless blending of cream products.
- Beauty sponges: Ideal for a diffused, natural finish with liquids and creams.
When it comes to highlighting, smaller, fluffy brushes, like fan brushes or tapered highlighting brushes, are perfect for dusting powder highlighters onto the high points of the face. These brushes pick up just enough product to create a delicate glow without over-applying. For liquid or cream highlighters, a damp beauty sponge or even your fingertips can be highly effective. Sponges help to press the product into the skin, creating a diffused, natural luminosity, while fingertips can offer a more precise and intense application, especially for small areas like the Cupid’s bow or inner corner of the eye.
Ultimately, a combination of tools often yields the best results. A damp beauty sponge can be invaluable for blending out any harsh lines after initial product application, whether with creams or powders. The dampness helps to melt the product into the skin, achieving a smoother, more natural finish. Investing in a few quality tools that complement your chosen products and techniques will significantly enhance your contouring and highlighting game, making the process smoother and the results more refined.
Step-by-step contouring for different face shapes
Contouring is not a one-size-fits-all technique; its effectiveness lies in tailoring the application to your specific face shape. Understanding where to place your contour can make a significant difference in enhancing your unique facial structure. While the general principle remains the same – creating shadows to define – the exact placement will vary.
For individuals with a round face, the aim is to create longer, more defined angles. Contour should be applied from the temples, down the sides of the forehead, under the cheekbones towards the corners of the mouth, and along the jawline. This technique helps to narrow the face and add dimension, giving the illusion of a more oval shape. The key is to blend upwards on the cheekbones to lift the face and downwards on the jawline to create definition.
Customizing contour to your unique canvas
Identifying your face shape is the first step towards a truly personalized and effective contouring application. Tailoring your technique ensures the most flattering results for your features.
- Identifying your face shape: Oval, round, square, heart, long.
- Targeted application: Specific areas for each face shape.
- Blending is paramount: Always blend for a natural finish.
If you have a square face, the goal is to soften sharp angles and create a more oval appearance. Apply contour along the temples and jawline, focusing on the corners of the face. For the cheekbones, apply contour in a diagonal line from the ear towards the middle of the cheek, blending upwards. This softens the jawline and forehead, contributing to a more balanced look. For those with an oval face, considered the “ideal” shape, contouring is used to enhance natural features rather than dramatically reshape. Lightly contour under the cheekbones, along the temples, and perhaps a touch under the jawline to add subtle definition.
Heart-shaped faces, with wider foreheads and narrower chins, benefit from contour applied along the temples to minimize width, under the cheekbones, and slightly on the very tip of the chin to balance the face. Long faces can be shortened by applying contour along the hairline and directly under the chin horizontally, in addition to the cheekbones, to break up vertical length. Regardless of your face shape, always remember that blending is crucial to avoid harsh lines and achieve a natural, diffused shadow that enhances your features subtly.
Strategic highlighting for a radiant glow
Highlighting is the counterpart to contouring, designed to bring light to the face and accentuate your best features. This technique works by applying a luminizing product to the areas where light naturally hits, creating a fresh, radiant, and lifted appearance. The key is strategic placement and a light hand to achieve a natural, “lit-from-within” glow rather than an overly metallic or glittery look.
The tops of your cheekbones are a prime area for highlighting. Applying highlighter here lifts the face and makes your cheekbones appear more prominent. When applying, sweep or dab the product along the highest point of your cheekbones, extending slightly towards your temples. The brow bone, just beneath the arch of your eyebrow, is another essential spot. A touch of highlighter here lifts the brow and makes the eyes appear more open and awake.
Illuminating your features: where to apply highlighter
Understanding the focal points for highlighting allows you to enhance your facial symmetry and create a captivating glow that draws attention to your best assets.
- Cheekbones: For a lifted and defined look.
- Brow bone: To open up the eyes and lift the brow.
- Nose bridge: For a straighter, more defined nose.
- Cupid’s bow: To enhance lip shape and volume.
To make your nose appear straighter and more defined, apply a thin line of highlighter down the bridge of your nose, avoiding the tip unless you want to make it appear longer. For a subtle plumping effect on your lips, dab a small amount of highlighter on your Cupid’s bow, the dip above your upper lip. This technique enhances the natural curve of your lips. For an extra touch of brightness and to make your eyes look wider, apply a tiny bit of highlighter to the inner corners of your eyes.
Beyond these classic points, you can also apply a sheer wash of highlighter to the center of your forehead (if you have an oval or long face) and chin to bring these areas forward, balancing your facial features. The goal is always to enhance, not overpower. Choose a highlighter that complements your skin tone: cooler tones for fair skin, warmer, golden tones for medium and dark skin. Blend well to ensure a seamless transition from your skin to the highlighted areas, achieving a luminous, natural radiance that catches the light beautifully.
Common mistakes to avoid and pro tips for perfection
Contouring and highlighting can drastically transform your makeup look, but like any art, it’s easy to fall into common pitfalls. Awareness of these mistakes, coupled with some professional tips, can help you achieve a flawless finish every time, avoiding an unnatural or overdone appearance.
One of the most frequent mistakes is using the wrong shade of contour. Many people opt for shades that are too warm or orange, making shadows look unnatural or muddy. Contouring shades should be cool-toned and matte, mimicking the natural shadow of the skin. Another common error is failing to blend adequately. Harsh lines are a dead giveaway of poorly applied contour and highlight. The key to a seamless look is to blend, blend, and blend some more, ensuring that products melt into the skin for a soft, diffused effect.
Refining your technique: pro advice and pitfalls to bypass
Mastering contouring and highlighting involves more than just product application; it requires attention to detail, proper blending, and understanding light and shadow. Avoid these common mistakes to achieve a more natural and polished result.
- Wrong shades: Use cool-toned, matte contours and complementary highlighters.
- Poor blending: Always blend thoroughly to avoid harsh lines.
- Over-application: Start with little and build up gradually.
- Ignoring lighting: Check your makeup in various lighting conditions.
Over-application is another significant blunder. It’s tempting to pile on products for a dramatic effect, but this often leads to a cakey or artificial look. Start with a small amount of product and gradually build up intensity until you achieve your desired level of definition and glow. It’s much easier to add more product than to remove excess. For highlighting, avoid glittery products for everyday wear; opt for finely milled, shimmering formulas that deliver a natural luminosity, especially if you have textured skin, as glitter can emphasize imperfections.
A crucial pro tip is to always check your makeup in various lighting conditions, especially natural light. What looks good under bright bathroom lights might appear stark in daylight. Additionally, consider setting your cream or liquid products with a light dusting of translucent powder or a matching powder contour/highlighter to increase longevity, especially if you have oily skin or live in a humid environment. Finally, remember that contouring and highlighting are about enhancing your natural beauty, not concealing it. Experiment with techniques and products to find what truly compliments your unique features and style, leading to a polished and confident appearance.
Maintaining your look: setting and touch-ups
Once you’ve meticulously sculpted and illuminated your face, the next crucial step is ensuring your masterpiece lasts throughout the day or night. Setting your contour and highlight is just as important as the application itself, preventing smudging, fading, and creasing. Furthermore, being prepared for touch-ups can rescue your look from the challenges of a long day.
For cream or liquid contour and highlight, setting powder is your best friend. A translucent setting powder applied sparingly over these areas will lock them in place without altering the color or finish. If you’ve used powder products, a setting spray is highly effective. Setting sprays create a protective barrier over your makeup, helping it adhere better to your skin and extending its wear time. They can also help to fuse powder products with your skin, giving a more natural, less powdery finish.
Longevity and revitalization: ensuring your glow endures
Making your sculpted look last requires a combination of strategic setting and timely touch-ups. These steps are essential for maintaining a fresh and defined appearance from morning to night.
- Set cream/liquid products: Use translucent powder.
- Set powder products: Employ a setting spray for extended wear.
- Minimal touch-ups: Focus on T-zone and high points.
- Carry essentials: Blotting papers and a compact for on-the-go.
When it comes to touch-ups, less is often more. Over-applying products throughout the day can lead to a heavy, cakey look. Instead, focus on areas that tend to fade or become oily, such as the T-zone and your highlighted areas. For oiliness, use blotting papers to absorb excess oil without disturbing your makeup. Then, if necessary, lightly reapply a small amount of powder contour or highlight to revitalize areas that have lost their definition or luminosity.
Carrying a compact powder with a built-in mirror, or a small pan of your powder contour and highlight, can be incredibly convenient for on-the-go adjustments. A clean, fluffy brush can also be useful for blending away any oil-induced caked areas. Ultimately, the goal is to maintain the fresh, defined look you worked so hard to create. By carefully setting your makeup and being prepared for subtle touch-ups, you can ensure your contour and highlight remain impeccable from application to the end of your day, giving you lasting confidence in your sculpted complexion.
| Key Point | Brief Description |
|---|---|
| 🎨 Proper Products | Choose creams, powders, or liquids based on skin type and desired finish. |
| 🖌️ Right Tools | Utilize specific brushes and sponges for optimal blending and application. |
| ✨ Strategic Placement | Apply contour and highlight according to your unique face shape. |
| 💡 Blending & Setting | Crucial for a seamless finish and extended wear throughout the day. |
Frequently asked questions about contouring and highlighting
Contouring involves using a matte, darker shade to create shadows and define features, making them recede. Highlighting uses a lighter, often shimmery product to reflect light, bringing features forward and creating brightness. They work together to add dimension to the face.
The ideal contour shade should be two to three shades darker than your natural skin tone and have a cool, ashy undertone. Avoid warm or orange-toned bronzers, as these won’t mimic natural shadows effectively, leading to an unnatural appearance.
While both add dimension, bronzer typically has a warm or orange undertone and is meant to add warmth to the skin, mimicking a tan. Contour, on the other hand, is cooler-toned to create shadows and definition. Using a bronzer as contour might result in a muddy or unnatural look.
Highlighter should be applied to the high points of your face where light naturally hits. Common areas include the very tops of your cheekbones, the brow bone, the bridge of your nose, and the Cupid’s bow. These spots enhance features and add a natural-looking glow.
Cream contour is often recommended for beginners due to its blendability and forgiving nature. It’s easier to work with and correct mistakes compared to powders, which can be harder to blend seamlessly once applied. Cream products also tend to look more natural.
Conclusion
Mastering contouring and highlighting is an empowering journey that allows you to sculpt, define, and illuminate your features with precision and artistry. By understanding the foundational principles, selecting the right products and tools, and applying techniques tailored to your unique face shape, you can achieve a flawless and radiant complexion. Remember that practice makes perfect, and the ultimate goal is to enhance your natural beauty, creating dimension and a luminous glow that reflects your confidence. Embrace the process, experiment with different looks, and enjoy the transformative power of these essential makeup techniques in your daily routine.


