How to Sew a Quilted Laptop Sleeve for Protection: A DIY Guide
Anúncios
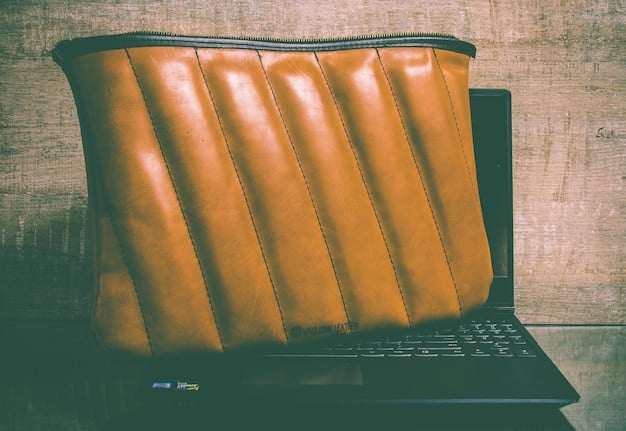
A quilted laptop sleeve provides superior protection against everyday bumps and scratches, extending the lifespan of your device while offering a personalized, stylish alternative to store-bought options.
Learning how to sew a quilted laptop sleeve for protection is a fulfilling and practical project, transforming basic fabric into a custom-fit, durable shield for your valuable device. This guide will walk you through the entire process, from selecting the right materials to finishing touches, ensuring your laptop stays safe and stylish.
Understanding the Basics: Why a Quilted Sleeve?
Creating a quilted laptop sleeve goes beyond mere aesthetics; it’s a strategic choice for enhanced device protection. Unlike simple fabric cases, quilting incorporates multiple layers, including batting, which provides crucial cushioning against impacts, drops, and abrasions. This multi-layered approach distributes external forces more effectively, significantly reducing the risk of damage to your laptop’s delicate components. Furthermore, a custom-made sleeve offers a snug fit, preventing the laptop from shifting around inside, which can lead to unnecessary wear and tear over time.
The appeal of a quilted sleeve also lies in its personalization. Mass-produced sleeves often come in limited designs and sizes, making it challenging to find one that truly reflects your style or perfectly accommodates your specific laptop model. By sewing your own, you gain complete control over fabric choices, color schemes, and even the type of quilting stitch, allowing for a unique accessory that stands out. This personal touch can be a great conversation starter and adds a layer of professionalism or fun to your daily carry. It’s an opportunity to blend functionality with personal expression, creating something that is both practical and aesthetically pleasing.
Gathering Your Materials: The Essential Toolkit
Embarking on your quilted laptop sleeve project requires a specific set of materials and tools to ensure successful execution and a professional finish. The right foundation, starting with quality fabrics, is paramount. For the exterior, consider durable cotton or canvas that can withstand daily use and friction. For the interior lining, a softer fabric like flannel or quilting cotton is ideal, as it won’t scratch your laptop’s surface. The core of your sleeve’s protection comes from the batting; a medium-loft cotton or polyester batting is recommended for its cushioning properties and ease of quilting. Always pre-wash and iron your fabrics to prevent shrinkage and ensure accurate cutting later.
Selecting the Perfect Fabric
The choice of fabric significantly impacts both the appearance and the durability of your sleeve.
- Outer Fabric: Choose a sturdy, tightly woven fabric like duck cloth, canvas, or even a heavy quilting cotton. These materials resist wear and tear and provide a good basis for quilting. Consider patterns or solids that reflect your personal style.
- Inner Fabric: Opt for a soft, smooth fabric like flannel, quilting cotton, or even a silky fabric. This layer will be directly in contact with your laptop, so scratch-resistance is key.
- Batting: Medium-loft cotton or polyester batting is excellent for padding. Make sure it’s not too thick, as this could make the sleeve bulky, or too thin, offering insufficient protection.
Beyond fabrics, the correct tools are indispensable for precise cutting, stitching, and finishing. A rotary cutter and self-healing mat are highly recommended for accurate straight lines, which are crucial for a well-fitting sleeve. Sharp fabric scissors are also necessary for detailed cuts. For marking, tailor’s chalk or a washable fabric marker will help you transfer patterns and quilting lines without damaging your fabric. Quality polyester thread, matching or contrasting your fabric, will ensure strong seams. Finally, a sewing machine is essential for efficiency, though hand-sewing is an option for those with patience and experience.
Tools You Can’t Do Without
Having the right tools simplifies the process and enhances the outcome.
- Rotary Cutter & Mat: For precise, clean cuts, especially for straight lines.
- Fabric Scissors: For trimming, notching, and cutting curves.
- Sewing Machine: A standard sewing machine with a walking foot (if available) will make quilting much easier.
- Thread: All-purpose polyester thread is strong and durable.
- Pins & Clips: To hold layers together securely before sewing.
- Iron & Ironing Board: For pressing seams and fabric, an often-overlooked but crucial step for a professional finish.
Having all these materials and tools prepared before you begin will streamline your process, allowing you to focus on the creative and technical aspects of sewing your quilted laptop sleeve. Proper preparation ensures that your project is not only aesthetically pleasing but also functionally robust.
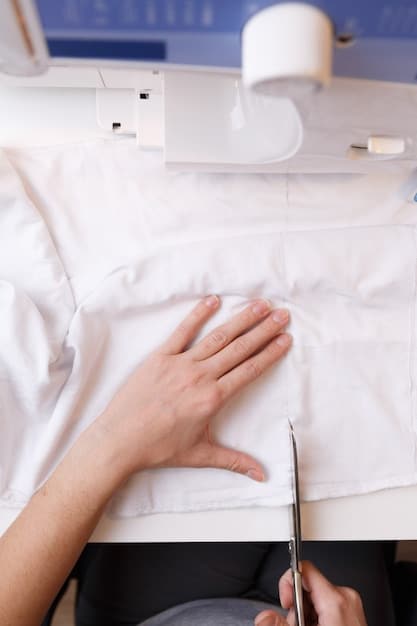
Measuring and Cutting: Precision is Key
Accurate measuring and cutting are the foundational steps for a successful laptop sleeve that fits perfectly. Begin by measuring your laptop’s dimensions: length, width, and thickness. It’s critical to add sufficient seam allowance and ease to these measurements to ensure your laptop slides in and out comfortably without being too loose or too restrictive. A common recommendation is to add 1 inch to both the length and width for seam allowance and a little extra room. For the thickness, an additional 0.5 to 1 inch might be needed, depending on the batting loft you are using. This extra space accommodates the bulk of the batting and ensures the sleeve isn’t too tight once quilted.
Once your final dimensions are determined, it’s time to cut your fabric and batting. You will need two pieces each of your main outer fabric, lining fabric, and batting. Lay your fabrics flat and smooth to prevent distortion, using tailor’s chalk or a washable fabric marker to outline your cutting lines. For precision, particularly with straight lines, a rotary cutter and a self-healing mat are invaluable tools. These will help you achieve crisp, even edges, which are essential for aligning your pieces accurately during sewing and quilting. Remember that any inaccuracies here will compound throughout the project, potentially leading to a sleeve that doesn’t fit or looks uneven.
Double-checking your measurements before making any cuts is a golden rule in sewing. Even a slight miscalculation can affect the final fit. After cutting, label your pieces if necessary, especially if you’re using directional fabrics or have multiple similar-looking pieces. This meticulous approach to measuring and cutting lays the groundwork for a professional-looking and perfectly sized quilted laptop sleeve, providing the ideal protective housing for your device.
The Art of Quilting: Adding Protection and Texture
Quilting is the process that transforms simple layers of fabric and batting into a cohesive, cushioned textile, providing both durability and a distinct aesthetic to your laptop sleeve. Before you begin quilting, you need to create a “quilt sandwich.” This involves placing your outer fabric right side down, centering your batting on top, and then placing your inner fabric right side up on top of the batting. This layering ensures that when you quilt, the stitches secure all three layers together. Secure these layers with basting pins or spray adhesive to prevent shifting during the quilting process. This step is crucial for achieving smooth, even quilting without puckering or misalignment.
Choosing Your Quilting Design
The quilting design you choose will greatly influence the look and feel of your sleeve.
- Straight Line Quilting: Simple and modern, straight lines can be sewn parallel, perpendicular, or diagonally across your fabric. Use a ruler and washable marker to draw your lines or follow the edge of your presser foot.
- Free-Motion Quilting: For a more organic, textured look, free-motion quilting allows you to draw with your needle, creating swirls, stippling, or custom patterns. This requires a darning foot and lowering your feed dogs.
- Diamond or Grid Patterns: These geometric patterns add stability and visual interest, often achieved by stitching diagonal lines in opposite directions.
Once your layers are basted and your design chosen, it’s time to sew. If you’re using a sewing machine, a walking foot can be incredibly helpful as it feeds all layers through the machine evenly, reducing the chance of fabric shifting or stretching. Sew slowly and consistently, following your chosen design. When you’ve completed all your quilting stitches, remove any basting pins or excess spray adhesive, and trim the excess batting and lining fabric so all three layers are perfectly aligned with your outer fabric’s dimensions. This careful attention to detail during the quilting phase ensures that your laptop sleeve is not only well-protected but also visually appealing and professionally finished.
Assembling Your Sleeve: Stitching it All Together
With your quilted panels ready, the next step is to assemble your laptop sleeve, transforming flat pieces into a three-dimensional protective case. This stage requires careful alignment and precise stitching to ensure a neat and functional finish. Begin by taking your two quilted pieces and placing them right sides together. Align all edges meticulously, ensuring that any quilting patterns match up if desired. Pin generously around the three open sides – the bottom and the two sides that will eventually form the sleeve’s opening – leaving the top edge unstitched. The more accurately your edges are aligned and pinned, the cleaner your seams will be.
Once pinned, stitch around the three raw edges using a straight stitch and a consistent seam allowance, typically 1/2 inch or 5/8 inch. It’s good practice to backstitch at the beginning and end of each seam to reinforce it, preventing unraveling. After stitching, clip the corners of the seam allowance diagonally, being careful not to cut through the stitching line. This step reduces bulk in the corners, allowing them to turn out more crisply. You can also trim the seam allowances slightly if they seem too bulky, but ensure they are still wide enough to prevent the fabric from fraying too easily.
Creating the Finishing Touches and Closure
The choice of closure for your laptop sleeve impacts both its security and ease of use.
- Zipper: A strong and secure option. Install the zipper before sewing the side seams of the sleeve. The zipper tape can be sewn directly to the top edges of the outer fabric and lining, allowing for a full closure.
- Velcro: Easy to use and effective. Sew strips of Velcro to the inside of the flap and the corresponding part of the sleeve opening.
- Button/Loop: Offers a classic, elegant look. A fabric loop can be sewn into one side, with a button on the opposite side of the opening.
Finally, turn your sleeve right side out. Use a blunt tool, like a chopstick or a point turner, to gently push out the corners, achieving sharp, defined angles. Give the entire sleeve a good press with an iron to flatten the seams and give it a polished appearance. At this point, you will have a functional, open-top sleeve. The final step in assembly involves integrating your chosen closure mechanism, whether it’s a zipper, Velcro, snaps, or a flap with a button. This last detail not only secures your laptop but also adds a final touch of craftsmanship to your handmade sleeve.
Adding a Touch of Personalization and Functionality
Beyond basic protection, a quilted laptop sleeve offers ample opportunity for personalization and the addition of functional elements that enhance its utility. Think about how you use your laptop and what extra features might make your sleeve even more convenient. For instance, incorporating an external pocket can be immensely useful for carrying accessories like charging cables, a mouse, or a USB drive. This pocket can be quilted separately and then attached to the exterior of the sleeve before the final assembly, or it can be a simple patch pocket sewn directly onto one of the quilted panels. The design possibilities for these pockets are endless, ranging from a simple rectangle to a zippered pouch for added security.
Another idea for personalization is incorporating appliqué or embroidery onto the outer fabric before quilting. This allows you to add monograms, intricate designs, or even playful motifs that truly make the sleeve uniquely yours. Consider using contrasting fabrics for these elements to make them pop, or keep them subtle for a more understated elegance. If you prefer a simpler approach, choosing a fabric with a bold pattern or a vibrant color can be enough to express your style. The texture created by different quilting patterns itself adds a layer of intricate detail, turning a functional item into a piece of art.
Furthermore, integrating a handle or a shoulder strap can transform your sleeve from a simple protective case into a carrying solution. A handle can be made from a strip of quilted fabric, sewn into the top seam of the sleeve, or a detachable strap can be added using D-rings or swivel hooks. These additions greatly improve portability, allowing you to carry your laptop comfortably without needing an additional bag. Whether it’s a hidden internal pocket for small notes, a decorative patch, or a practical carrying strap, these thoughtful embellishments are what truly elevate your handmade quilted laptop sleeve from a mere protector to a versatile and cherished accessory.

Caring for Your Quilted Laptop Sleeve
Once your beautifully crafted quilted laptop sleeve is complete, understanding how to properly care for it is crucial to maintain its appearance and prolong its protective qualities. Just like any textile item, your sleeve will eventually accumulate dirt, dust, or accidental spills, necessitating cleaning. The best approach to cleaning depends largely on the fabrics and batting you chose for your project. Generally, most quilted items made from cotton fabrics can be gently machine washed, but it is always wise to refer to the care instructions of your specific fabrics and batting, especially if you used any special finishes or delicate materials.
For light cleaning or spot treatment, a damp cloth with a mild soap can be used to gently blot away stains. Avoid harsh chemicals or excessive scrubbing, as this can damage the fabric fibers or distort the quilting stitches. For a deeper clean, if machine washing is appropriate, use a gentle cycle with cold water and a mild detergent. It’s often beneficial to place the sleeve in a mesh laundry bag to protect it from excessive agitation. Avoid using bleach, which can discolor fabrics and weaken fibers. After washing, reshape the sleeve gently and lay it flat to air dry. Tumble drying, especially on high heat, can cause significant shrinkage, particularly if your fabrics were not pre-washed, and could also damage the batting or distort the sleeve’s shape.
Regular care also includes avoiding prolonged exposure to direct sunlight, which can fade fabric colors over time. If your sleeve does not have specific waterproofing, be mindful of its exposure to liquids, as fabric-based sleeves are not inherently waterproof. In case of a major spill, prompt action is key: blot the liquid immediately and follow the appropriate cleaning steps. By following these care guidelines, your quilted laptop sleeve will continue to provide reliable protection and maintain its handcrafted beauty for years to come, reflecting the effort and creativity you poured into making it.
| Key Aspect | Brief Description |
|---|---|
| 📏 Precision | Accurate measuring and cutting are vital for a perfect fit and professional look. |
| 🧵 Quilting | Secures layers, adding essential cushioning and texture to the sleeve. |
| ✨ Personalization | Customize with unique fabrics, quilting designs, and functional additions like pockets. |
| 🧼 Care | Gentle washing and proper drying extend the life and appearance of your sewn sleeve. |
Frequently Asked Questions About Sewing a Quilted Laptop Sleeve
For the outer fabric, sturdy options like cotton canvas, duck cloth, or heavier quilting cotton are best for durability. For the lining, soft fabrics such as flannel or quilting cotton are ideal to prevent scratches on your laptop. Always choose pre-shrunk fabrics or pre-wash them yourself.
Medium-loft cotton or polyester batting generally offers the best balance of cushioning and low bulk. Avoid overly thin batting, which offers insufficient protection, or overly thick batting, which can make the sleeve too bulky. Batting specifically labeled for bags or crafts often works well.
Yes, a standard home sewing machine can be used for quilting. A walking foot attachment is highly recommended as it helps feed multiple layers of fabric and batting evenly, preventing puckering and shifting. Regular sewing feet can also work, but with more careful attention to fabric management.
Beyond your laptop’s dimensions, add at least 1 inch to both the width and length measurements for seam allowances and ease. For the thickness of the laptop, add an additional 0.5 to 1 inch to the height. Always cut a little extra, as you can trim excess later.
For most cotton-based sleeves, gentle machine washing on a cold cycle with mild detergent is suitable. Air dry flat to maintain shape and prevent shrinkage. Spot clean with a damp cloth for minor spills. Avoid harsh chemicals or high heat. Always check individual fabric care instructions.
Conclusion
Mastering how to sew a quilted laptop sleeve for protection is a rewarding endeavor that combines creativity with practicality. By carefully selecting your materials, taking precise measurements, and dedicating attention to the quilting and assembly processes, you create a custom accessory that offers superior cushioning and reflects your unique style. This handmade sleeve not only safeguards your valuable device from daily wear and tear but also provides a sense of accomplishment and a durable, personalized item that stands apart from mass-produced alternatives. Embracing this project allows you to merge essential protection with personal flair, ensuring your laptop is both secure and stylishly housed.


