How to Distress Denim Jeans for Trendy Upcycled Style Under 2 Hrs
Anúncios
Achieving a trendy, distressed look on denim jeans involves strategic fraying, cutting, and bleaching techniques that can transform aged garments into fashionable, upcycled pieces, typically completed within a two-hour timeframe with basic household tools.
Are your denim jeans looking a bit bland, waiting for a style transformation? Dive into the world of creative upcycling and discover how to distress denim jeans for a trendy, upcycled style in under 2 hours. This guide offers practical, easy-to-follow steps to give your old favorites a fresh, edgy appeal, proving that a significant style upgrade doesn’t demand excessive time or sophisticated tools.
Understanding the Art of Distress: Why Upcycle Your Denim?
Distressing denim isn’t just about ripping holes in fabric; it’s a deliberate art form that breathes new life into old garments, transforming them into unique fashion statements. This process, often known as upcycling, contributes to sustainable fashion by extending the lifespan of clothing items, reducing textile waste, and offering a personalized touch that mass-produced items lack. The appeal lies in its versatility and the ability to customize jeans to reflect individual style, from subtly worn edges to bold, artful tears.
The beauty of distressing lies in its accessibility. You don’t need specialized equipment or a professional studio to achieve desirable results. Common household items like sandpaper, scissors, and razors become your primary tools, enabling a creative journey that yields fashionable outcomes. Moreover, the immediacy of the process – often completed within a couple of hours – makes it an attractive DIY project for anyone looking to refresh their wardrobe efficiently.
The Allure of Personalized Style
In an era dominated by fast fashion, personalized style stands out. Distressing your own denim allows for an unparalleled level of customization. You control the extent of wear, the placement of rips, and the subtle nuances that make each pair uniquely yours. This hands-on approach connects you more intimately with your clothing, fostering a greater appreciation for handmade craftsmanship and personal expression.
- Eco-Friendly Fashion: Extends garment life, reducing consumption.
- Unique Expression: Customizes jeans to reflect personal style.
- Cost-Effective: Revitalizes old items without new purchases.
- Creative Outlet: Provides a fun, hands-on artistic endeavor.
Furthermore, the satisfaction derived from transforming a plain pair of jeans into a trendsetting piece is immense. It’s a testament to your creativity and resourcefulness, allowing you to wear your individuality with pride. This foundational understanding sets the stage for exploring the practical techniques involved in achieving that perfect distressed look, emphasizing both the aesthetic and environmental benefits of this engaging craft.
Essential Tools and Materials for Your Distress Project
Before embarking on your denim distressing journey, it’s crucial to gather the right tools and materials. Having everything at hand ensures a smooth, uninterrupted process and helps you achieve the desired effects without frustration. While the list is relatively short and consists of common household items, their strategic selection is key to successful distressing, especially when aiming for a quick two-hour completion time.
The primary canvas for your project will, of course, be a pair of denim jeans. Opt for an old pair that you’re comfortable experimenting with, as initial attempts might not always yield perfect results. Thicker, sturdier denim tends to distress more predictably and holds its shape better after the process.
Gathering Your Distress Arsenal
Your toolkit for distressing denim is surprisingly simple yet effective. Each item plays a specific role in creating different types of wear and tear, from subtle fading to prominent rips. Understanding the function of each tool will empower you to create varied and authentic distressed effects.
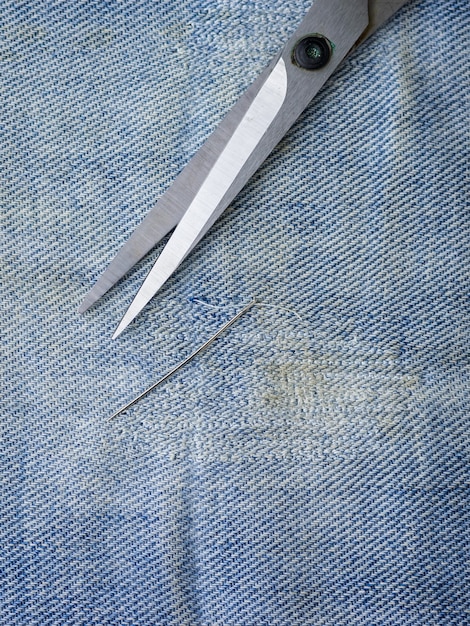
- Sharp Scissors: Essential for precise cuts and initiating fraying.
- Utility Knife/Box Cutter: Great for creating clean slits or larger openings.
- Sandpaper (various grits): For gentle abrasion and fading. A coarse grit (e.g., 60-80) for initial wear and a finer grit (e.g., 150-220) for subtle distressing.
- Cheese Grater/Rough File: Excellent for significant fraying and creating larger worn areas.
- Pumice Stone/Brillo Pad: For lighter abrasion and softening the fabric.
- Tweezers: Indispensable for pulling individual threads to create natural-looking fraying.
- Cardboard or Plywood: To place inside the jeans and protect the back leg during distressing.
- Chalk/Marker: For marking areas you intend to distress.
Choosing the right sandpaper grit, for instance, dictates the level of fading. A coarser grit will quickly create significant wear, while a finer one will achieve a more subtle, aged look. Similarly, the choice between scissors for a clean cut versus a utility knife for a jagged edge determines the character of your rips. Having a mix allows for greater artistic control. Always ensure your tools are sharp and in good condition for the best results and safety.

Prepping Your Jeans: Placement and Protection
Proper preparation is a vital step often overlooked, yet it significantly impacts the success and symmetry of your distressed denim. Before you begin cutting or abrading, taking the time to plan your distress areas and protect unintended sections of the fabric will save you time and prevent costly mistakes. This phase is about precision and foresight, ensuring that the distressed look integrates seamlessly with the overall design of your jeans.
Start by trying on your jeans. This allows you to identify natural points of wear and tear, such as knees, thighs, and pockets, which are ideal locations for distressing. Mark these areas lightly with chalk or a washable marker. Consider how the jeans fit and move on your body; for example, a rip too high on the thigh might expose too much skin, or one too low on the knee might look unnatural.
Strategic Placement and Safety First
Once you’ve marked your target areas, lay the jeans flat on a sturdy, non-marring surface. Insert a piece of cardboard or wood inside the leg of the jeans, directly beneath the area you plan to work on. This invaluable step protects the back of the jeans from accidental cuts or abrasions, ensuring that your distressed look is intentional and confined to the desired front or side areas.
- Wear Your Jeans: Mark natural wear points for authentic distressing.
- Protect Fabric: Use cardboard inside legs to prevent damage to the back.
- Define Areas: Draw outlines with chalk for precise distressing.
- Consider Proportions: Ensure distressing complements the jeans’ fit and your body shape.
For knee rips, consider marking the center of the kneecap when standing naturally. For thigh distressing, think about where natural creases form. Remember, starting small and gradually expanding your distressed areas is always advisable. You can always add more, but you can’t easily undo excessive damage. This careful preparation ensures that your two-hour transformation is efficient, precise, and yields a result you’ll love.
Techniques for Creating Authentic Fading and Fraying
Achieving an authentic distressed look involves more than just ripping holes; it’s about replicating the gradual wear and tear denim experiences over time. Fading and fraying are cornerstone techniques that add depth and character, mimicking countless washes and years of use. Mastering these methods is crucial for an upcycled style that looks effortlessly cool rather than deliberately damaged.
Sandpaper is your best friend for creating natural-looking fading. Start with a coarse grit (like 60 or 80) on areas you want to appear significantly worn, such as the thighs, knees, and around the pockets. Rub the sandpaper back and forth in small, circular motions. Apply moderate pressure, observing as the indigo dye begins to lighten and the fabric fibers break down. For a softer, more subtle fade, switch to a finer grit (150 or 220) and use lighter pressure, especially for areas like seams or raised textures.
Fraying: From Subtle to Significant
Fraying can range from delicate wisps of thread to substantial fibrous fringes. For subtle fraying, rub a pumice stone or a stiff brush vigorously over the marked areas. This technique works best on edges, pockets, and seams, creating a soft, worn look. The key is consistent, controlled friction that gently loosens the denim fibers without breaking them completely.
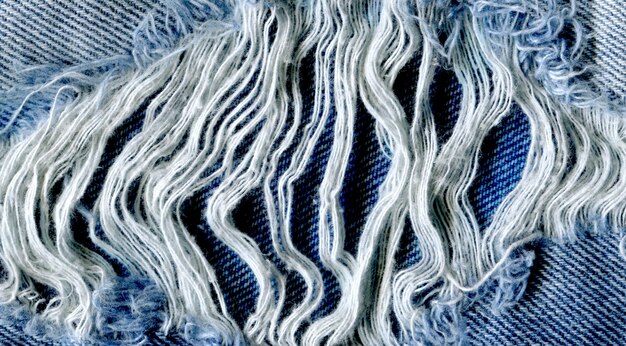
For more pronounced fraying, particularly around cuts or holes, employ a cheese grater or a utility knife (carefully!) to scuff up the fabric. After creating a rough patch, use tweezers to painstakingly pull out individual horizontal (white) threads, leaving the vertical (blue) threads intact. This meticulous process reveals the underlying white threads, creating that classic web-like distressed effect. This step is time-consuming but yields the most authentic results.
- Sandpaper Application: Rub coarse grit for significant fading, finer grit for subtle.
- Pumice Stone/Brush: Ideal for gentle fraying on edges and seams.
- Cheese Grater/Knife: Use for intense scuffing to initiate deep fraying.
- Tweezers for Fray: Pull horizontal threads to expose vertical ones for authentic rips.
Remember that distressing is an iterative process. You can always go back and add more fading or fraying. It’s better to start conservatively and build up the desired effect gradually, ensuring that each layer of distressing contributes to an overall look that is both trendy and genuinely upcycled.
Crafting the Perfect Rips and Holes: Precision and Control
While fading and fraying create a worn aesthetic, rips and holes are the signature elements of distressed denim, offering bold statements of style. Creating these features requires more precision and a strategic approach to ensure they look natural and intentional, rather than haphazard. The goal is to mimic the way denim tears organically over time, or to create a deliberate artistic statement that enhances the garment’s character.
Before making any cuts, accurately mark the desired locations and lengths of your rips with chalk. Remember, once a cut is made, it cannot be easily undone. For knee rips, aim for a position that aligns with the natural bend of your knee when sitting or standing. Use a sharp pair of scissors or a utility knife for clean, straight cuts. If you want a more jagged, natural tear, make a smaller initial cut and then use your hands to gently pull and tear the fabric, allowing the fibers to break imperfectly.
Achieving Varied Rip Effects
To create the popular “threadbare” or “web” look, where white horizontal threads are exposed within a rip, make two parallel horizontal cuts a few centimeters apart. Then, using tweezers, carefully pull out the vertical (blue) threads from between these two cuts, leaving only the horizontal (white) threads suspended across the gap. This takes patience but yields a highly authentic and stylish result. The more blue threads you remove, the more transparent the white web. For a less defined hole, simply make one horizontal cut and then use sandpaper or a coarse file around the edges to encourage fraying and expansion.
- Mark Accurately: Use chalk to define rip placement and length.
- Clean Cuts: Use sharp scissors or a utility knife for precise initial cuts.
- Natural Tears: Make a small cut, then hand-tear for organic edges.
- Threadbare Look: Make two parallel cuts, then remove vertical threads with tweezers.
For larger, more dramatic holes, multiple cuts can be made, or existing rips can be expanded outwards. Always work slowly and assess the progress after each modification. The beauty of distressing is in its imperfect nature, but a thoughtful approach ensures that your rips and holes enhance the jeans’ appeal, transforming them into a coveted, upcycled fashion piece rather than simply damaged clothing.
The Finishing Touches: Washing, Drying, and Maintaining Your Distressed Denim
Once you’ve meticulously distressed your denim jeans, the final steps of washing, drying, and maintenance are crucial for solidifying the look and preventing further, unwanted damage. These processes help to soften the distressed areas, encourage natural fraying, and settle the new texture, transforming your handiwork from a raw project into a truly worn and trendy garment ready for everyday wear.
After all the cutting, sanding, and pulling, individual fibers are loose and the denim might appear stiff or have lingering denim dust. A gentle wash cycle is essential. Turn your distressed jeans inside out to protect the newly created rips and frayed edges from excessive agitation in the washing machine. Use cold water and a mild detergent. Avoid hot water, as it can cause excessive shrinking or further damage to the weakened fibers. A delicate or hand-wash cycle is preferred over a heavy-duty one to minimize stress on the distressed areas.
Drying and Long-Term Care
When it comes to drying, air-drying is highly recommended. The high heat and tumbling action of a machine dryer can aggressively expand rips and loosen threads beyond your intention, potentially ruining your carefully crafted design. Lay the jeans flat on a clean surface or hang them to dry naturally. This allows the denim to relax and the distressed elements to set in a controlled manner. If you must use a dryer, opt for the lowest heat setting and remove the jeans while they are still slightly damp to finish air-drying.
- Wash Inside Out: Protect distressed areas during washing.
- Cold Water/Mild Detergent: Prevents excessive damage and color fading.
- Air Dry: Preserves distressed details and prevents over-fraying.
- Gentle Wear: Avoid excessive pulling on rips to maintain their shape.
For long-term care, continue to wash your distressed jeans inside out and air-dry them whenever possible. Be mindful when wearing them; avoid snagging the rips on sharp objects. Over time, the distressed areas will naturally evolve, potentially expanding slightly or developing more character. Embracing this evolution is part of owning upcycled style. By following these finishing and maintenance steps, you ensure that your trendy, distressed denim remains a stylish, long-lasting addition to your wardrobe.
Troubleshooting and Pro Tips for Distressing Denim
Even with careful planning, distressing denim can sometimes present unexpected challenges. Knowing how to troubleshoot common issues and employing a few expert tips can significantly enhance your results, ensuring your upcycled jeans look professionally done and stand the test of time. These insights are particularly valuable when aiming for a quick turnaround, helping you avoid pitfalls and optimize your two-hour distressing project.
A common issue is over-distressing, where rips become too large or fabric becomes too flimsy. If a rip expands more than intended, you can often sew a small patch of similar denim or a contrasting fabric (like lace or plaid) on the inside to stabilize it and add a unique design element. For areas that become too thin, applying fabric adhesive or a clear fabric sealant on the inside can reinforce the fibers without altering the external look. Prevention is key; always start with smaller cuts and less abrasion, as you can always add more.
Maximizing Your Distress Potential
Consider the stretch of your denim. Jeans with significant stretch often don’t hold distressed effects as well as rigid denim. The elastic fibers tend to snap back, making it harder to create lasting holes and fraying. If working with stretchy denim, be prepared for a slightly different outcome and perhaps more subtle distressed effects.
- Start Small: Always begin with minimal distressing; you can always add more.
- Consider Denim Type: Rigid denim distresses better than stretchy types.
- Use a Backer: Always use cardboard or wood inside the leg to protect the back.
- Experiment with Tools: Different tools create varied effects; try them on scrap denim first.
- Wash for Finish: One wash after distressing sets the look and removes loose fibers.
For a natural fading effect that mimics real wear, focus distressing on high-friction areas: knees, thighs, edges of pockets, and the hem. Use a stencil or draw outlines for consistent patterns if you’re aiming for symmetrical distress on both legs. Over-dyeing specific areas with a light fabric dye after distressing can also create unique washed-out effects. And finally, don’t be afraid to experiment! Practice on an old pair of jeans or fabric scraps to get a feel for how different tools and techniques interact with denim fabric. This experience will build your confidence and ensure your distressed denim project is a smashing success.
| Key Point | Brief Description |
|---|---|
| ✂️ Tool Selection | Choose sharp tools like scissors, sandpaper, and tweezers for precise distressing. |
| 🎯 Strategic Placement | Mark areas to distress while wearing jeans, and protect the back with cardboard. |
| ⛓️ Fading & Fraying | Use sandpaper for fading, and tweezers/graters for varying degrees of fraying. |
| 💧 Post-Distress Care | Wash inside out with cold water and air dry to set the distressed look. |
Frequently Asked Questions About Distressing Denim
While you can distress most denim types, rigid, non-stretch denim tends to hold distressed effects, especially rips and holes, better and more authentically. Stretchy denim often has elastic fibers that can snap back, making it harder to create lasting rips or fraying. Experiment on an old pair first to see how your specific denim responds.
The key to avoiding over-distressing is to start small and work incrementally. Begin with minor cuts and gentle abrasion. You can always add more distressing, but it’s hard to revert once too much is done. Regularly check your progress against your desired look and stop periodically to assess the current state of the denim.
For natural-looking fraying, focus on pulling individual horizontal white threads with tweezers after making a small cut. This exposes the vertical blue threads, mimicking organic wear. Sandpaper or a pumice stone can also create subtle fraying and softening of the fabric edges over time. Focus on areas that would naturally fray, like hems and pockets.
To maintain your distressed look, always turn your jeans inside out before washing. Use cold water and a gentle cycle with mild detergent to minimize stress on the distressed areas. Air-drying is highly recommended, as the heat and tumbling of a machine dryer can excessively expand rips and further loosen threads, potentially ruining your design.
Yes, safety is paramount. Always use sharp tools carefully and away from your body. Place a piece of sturdy cardboard or wood inside the distressed area of the jeans to protect the fabric underneath and prevent accidental cuts to yourself or the other side of the garment. Handle utility knives and graters with extreme caution to avoid injury.
Conclusion
Transforming a plain pair of denim jeans into a trendy, upcycled style is an incredibly rewarding and accessible DIY project that can be completed efficiently, often in under two hours. By carefully selecting your tools, meticulously planning your distressing areas, and applying techniques for fading, fraying, and ripping with precision, you can breathe new life into your wardrobe. This process not only allows for unique personal expression but also champions sustainable fashion by extending the garment’s lifecycle. Embrace the creativity, take pride in your unique creation, and enjoy sporting denim that truly reflects your individual style, all while contributing to a more conscious wardrobe.


